Understanding and Designing Policies in API Management (API-M)
This blog is a multi-part series, and visit related topics for a complete understanding of the overall API-M solution.
Navigate in Blog Series
-
Azure API Management (API-M) Overview

-
Designing API Products

-
Versioning and Revisioning

- Understanding & Designing Policies [👈You are here]
-
Security Best Practices

- Project Structure
- Monitoring Analytics
- API Documentation
- Development Workflow & APIs CI/CD
- Automating Developer Portal via CI/CD
Azure API Management (API-M) policies are the heart and soul of the service. It is, in fact, the most powerful feature that makes API-M stand out as an API management suite. Policies are a collection of XML and C# code snippets executed sequentially on an API’s request and response flow, controlling its access behaviour and format of the payload. In this post, we will understand more about policies and some design considerations. We will learn how to use this powerful feature to enhance and protect our backend services and how it can genuinely shine as a management layer to our APIs.
Understanding Policy
Policy definitions are simple XML blocks describing a sequence of statements executed on the HTTP(s) request and response response flows. The Azure portal provides an interactive UI-driven pane for predefined code snippets we can drag, drop, and configure. We can also write our own within the policy editor if we understand the syntax.
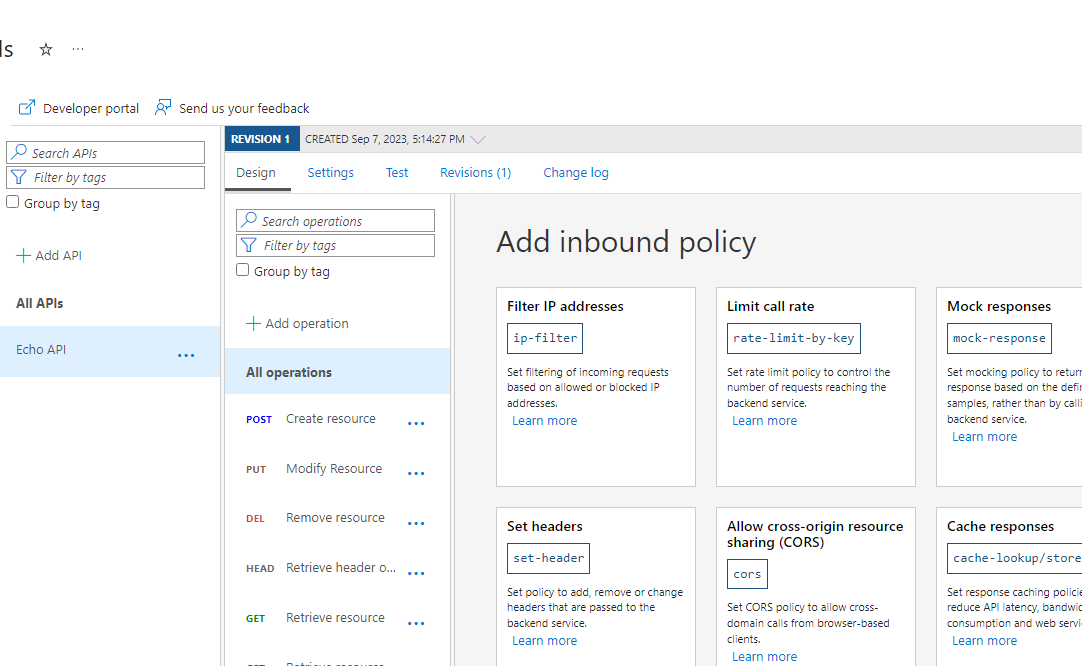
Pro Tip: Until you get familiar, start with the UI and play the configurations using the policy editor while understanding the fields using documentation.
An empty policy looks like the one below with a few different sections, which we will look at next.
<policies>
  <inbound>
    <!-- statements applied to the request go here -->
  </inbound>
  <backend>
    <!-- statements applied before the request forwarded to the backend service go here -->
  </backend>
  <outbound>
    <!-- statements applied to the response go here -->
  </outbound>
  <on-error>
    <!-- statements to be applied if there is an error condition go here -->
  </on-error>
</policies>
Policy Sections
A policy is separated into a few sections. The inbound rules are evaluated on the request before it is sent to the backend, and the outbound rules are processed before the response is returned to the caller. The backend rules are executed between inbound and outbound, generally used for routing and forwarding to the appropriate backend service/ endpoint. Any errors between the three sections terminate the remainder of the flow, and the on-error policy statements are processed.
Expressions
The policy expressions are written as a single-line, well-formed C# code statement enclosed in @(expression) or a multi-line statement expressed inside the @{expression} block, which must end with a return statement. At the time of this post, it supports syntax in C# 7
// Single Line Expression
@(true)

@((1+1).ToString())

@("Hi There".Length)

@(Regex.Match(context.Response.Headers.GetValueOrDefault("Cache-Control",""), @"max-age=(?<maxAge>\d+)").Groups["maxAge"]?.Value)

@(context.Variables.ContainsKey("maxAge") ? int.Parse((string)context.Variables["maxAge"]) : 3600)

// Multi-Line Expression Block
@{
  string[] value;
  if (context.Request.Headers.TryGetValue("Authorization", out value))
  {
      if(value != null && value.Length > 0)
      {
          return Encoding.UTF8.GetString(Convert.FromBase64String(value[0]));
      }
  }
  return null;

}
Context Variable
The context is a read-only property variable implicitly available in every policy expression. Its members. It provides information relevant to the API request, response, and related properties. To see the complete list of the available list of operations, visit here.
Scopes
Azure API Management allows evaluating policies at various levels, encouraging reusability and reducing duplicates. The scopes are as follows in order from most broad to most narrow.
- Global Policies (All APIs)
- Workspace (all APIs associated with a selected workspace)
- Product (all APIs related to a chosen product)
- API (all operations in an API)
- Operation (single operation in an API)
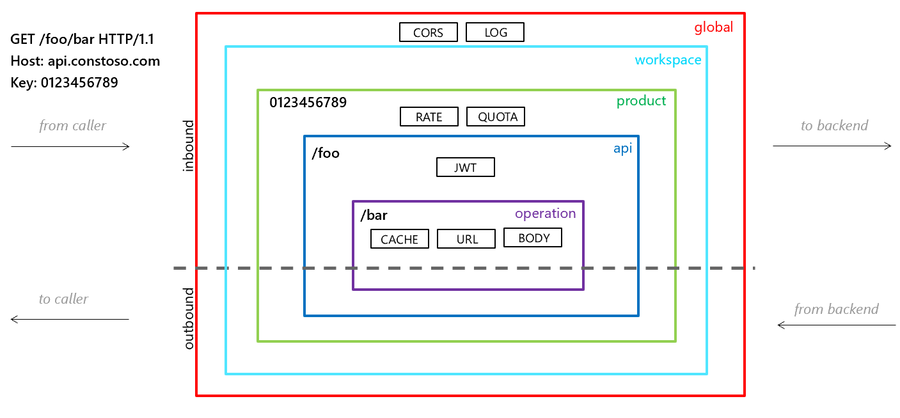
Some policies are designed only for specific sections. At the same time, some types can be in various levels. Their place in the policy determines the impact of the final behaviour and the outcome. When configuring policy definitions, we can control the policy evaluation order against the inherited scope by placing the policy snippet before or after the <base/> element in XML.
Note: The <base/> section is unavailable to the Global Policy level since it is the highest level in the hierarchy. Policies are executed in the order they appear from top to bottom. When it reaches <base/>, it runs the parent scope statement before continuing the remainder of the policy statements.

In the following example, the find-and-replace before statement would execute first; then, the find-and-replace after policy would execute after any policies at a broader scope (top-level) are evaluated.
<policies>
    <inbound>
        <find-and-replace from="xyz" to="before" />
        <base />
	<find-and-replace from="xyz" to="after" />
    </inbound>
</policies>
Note: If the same API is associated with multiple products depending on the subscription key used, the policies attached to the product associated with that subscription will be evaluated. It makes the same API under different products behave differently, like applying rate limiting and quota restrictions per different products.
Policy Design Considerations
In this section, I am sharing some learning from my previous projects. In each project, I had various challenges, requirements and security demands. However, some are so good that I cannot resist making them my defaults. But it is up to you to decide and fine-tune what works best for your requirements.
Removing Subscription Key
API-M subscription key is a private value between the API consumer and the API-M. Our backends don’t need to know this key. If we do, we risk exposing consumer credentials in the header, especially if the backend is a third-party system. So, removing the API-M subscription key from the header is always a good practice before sending the request to the backend. Ideally, this should be one of the global policies so that all policies in narrower scopes will honour this before sending the request to the backend.
<policies>
    <inbound>
        <!--  Don't expose the API-M subscription key to the backend. -->
        <set-header name="Ocp-Apim-Subscription-Key" exists-action="delete" />
    </inbound>
   ...
</policies>
Tracking Requests
It is always a good idea to tag each request with a unique tracking ID so we can trace our request from API-M to the backends. Of course, the key name is subjective to our implementation, and we must ensure that we don’t unnecessarily remove something consumers already set. In the below example, we create our CorrelationId and add it to our header so that it goes all the way to the backend, and this will become useful when we want to trace requests end to end.
<policies>
    <inbound>
        <!-- Set header: CorrelationId for Tracking Requests -->
        <set-header name="CorrelationId" exists-action="override">
            <value>
                @{
                    var guidBinary = new byte[16];
                    Array.Copy(Guid.NewGuid().ToByteArray(), 0, guidBinary, 0, 10);
                    long time = DateTime.Now.Ticks;
                    byte[] bytes = new byte[6];
                    unchecked
                    {
                        bytes[5] = (byte)(time >> 40);
                        bytes[4] = (byte)(time >> 32);
                        bytes[3] = (byte)(time >> 24);
                        bytes[2] = (byte)(time >> 16);
                        bytes[1] = (byte)(time >> 8);
                        bytes[0] = (byte)(time);
                    }
                    Array.Copy(bytes, 0, guidBinary, 10, 6);
                    return new Guid(guidBinary).ToString();
                }
            </value>
        </set-header>
    </inbound>
   ...
</policies>
Using Named Values
As the name implies, they are name and value pairs in each API Management instance. When we want to maintain a configurable way to define our policy conditions per each environment, consider using Named Values instead of creating a policy for each environment. Using the Named Value can significantly improve the maintainability of policies, whether the value comes directly from Named Values or sensitive information (passwords, API Keys) as Key Vault reference.
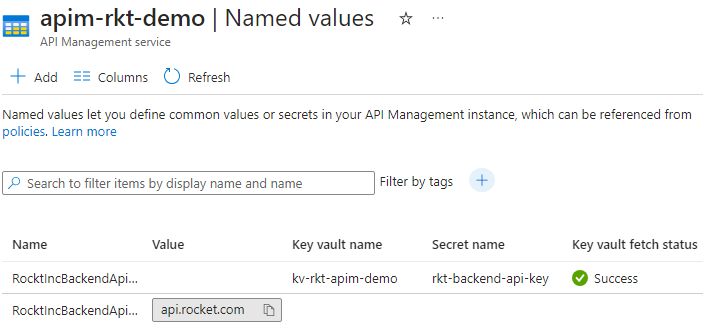
This ensures our policies stay consistent across environments and offloads the configuration to where it belongs. Also, given its configuration, any changes to the values are now a change to the Named Values, not the policy.
<policies>
    <inbound>
        <!--  Using Named Values instead of hardcoded endpoints. -->
        <set-backend-service base-url="{{ BackendApiEndpoint }}" />
    </inbound>
   ...
</policies>
Mocking APIs
Another important policy is the “Mock”, which is used to simulate the behaviour of an API operation without actually calling the backend service. This policy can be beneficial during the API development and testing phases when you want to isolate the API from its dependencies or if the backend service isn’t unavailable. The mock policy allows us to start implementing the front end as if it were calling a real backend service.
When the real backend service is ready, you can replace the mock policy with policies that route requests to the actual backend service. This transition is usually seamless for the API consumers, as they interact with the API in the same way regardless of whether it’s using the mock or the actual backend.
A simplified example of how a mock policy may look is below.
<inbound>
    <base />
    <!-- Mock policy configuration -->
    <mock-response status-code="200" content-type="application/json">
        <set-header name="X-Mock-Response" exists-action="override">
            <value>Mocked Response</value>
        </set-header>
        <set-body>
            {
                "message": "This is a mock response."
            }
        </set-body>
    </mock-response>
</inbound>
Note: Mock policy is a robust API development and testing feature but should be used judiciously. It’s essential to transition to the real backend service once available to ensure our APIs behave as expected in a production environment. Mock is not production-ready, and mock responses should never reach production scenarios. A cleaner way to load policies per environment is discussed later in this post.
Let Backends Do What They Meant to Do
Often, it’s an argument. Can API-M do it? Then do it. However, I would politely push back if it is within the control to change the backend. If the backend has a POST endpoint to create a single object, API-M should not accept a collection (array) of things and POST it iteratively to the backend to satisfy a backend requirement in the first place. I know it sounds bizarre, But I have had to push back in the past.
So, my ask here is always to question the intention. As an API-M owner, it is up to us to manage our APIs and not to deliver missed backend requirements.
Also, coming to API naming conventions, we should get our backend teams to fix their naming inconsistencies if it’s an API under development. API-M is not there to cover terrible development practices. API-M can be a shield to give some consistency to our consumers until the backends are aligned, but this should never be the norm.
Important: If you are a product owner or API-M owner, always consider pushing back getting API-M to do unnecessary business logic when backends are more capable of doing so. Because policies allow us to write C# snippets, there needs to be a place to maintain source code in a maintainable fashion; API-M is not the place for that.
Understanding Backends
When implementing policies, we should also learn more about our backends. Especially if our backends have throttling limits and retry conditions, we should take them into policy design considerations. For example, our backends may have more aggressive throttling when we have more graceful rate limiting at the API-M level. Likewise, we don’t want to exhaust those throttling limits by retrying to forward requests frequently to handle sporadic failures.
In a cloud-native world, always handle transient failures. However, we must also understand our backend limitations when designing them. Here is a quick example of a retry policy.
<policies>
    ...
    <backend>
        <retry condition="@(context.Response.StatusCode == 500)" count="5" interval="1" max-interval="20" delta="2" first-fast-retry="true">
            <forward-request buffer-request-body="true" />
        </retry>
    </backend>
    ...
</policies>
Protecting Backends
APIs are the gateway to our internal resources. We should always protect them, and policies can be a great asset to defend them. To ensure that we can throttle the incoming requests by the consumers. At the global level, we can have more relaxed limits, while for each backend service, we can make it more specific and tailor-made to fit its constraints.
Below is an example of rate limiting for inbound requests.
<policies>
    <inbound>
        <base />
        <rate-limit calls="20" renewal-period="90" remaining-calls-variable-name="remainingCallsPerSubscription"/>
    </inbound>
    <outbound>
        <base />
    </outbound>
</policies>
Caching for Better Response
With APIs, consumers would like to experience faster responses. On the contrary, we also want to reduce the number of round trips to our backends to avoid exhausting them for the same information. Caching is another capability API-M offers out of the box, and it can be extended by using a custom caching solution like Redis Cache.
However, caching must also be done in consultation with how backend services handle Cache. Double caching the information at the API-M level and as well as the backend can cause the users to observe unexpected delays in receiving the latest data. Caching is a great way to reduce the strain it can put on legacy systems where caching is not an option. Nevertheless, to implement caching, we also need to factor in the need for the latency requirements and backend design.
Below is an example of a Caching policy.
<policies>
    <inbound>
        <base />
        <cache-lookup vary-by-developer="false" vary-by-developer-groups="false" allow-private-response-caching="false" must-revalidate="false" downstream-caching-type="none" />
    </inbound>
    <backend>
        <base />
    </backend>
    <outbound>
        <base />
        <cache-store duration="10" />
    </outbound>
    <on-error>
        <base />
    </on-error>
</policies>
A Cleaner Way to Maintaining Policies
As we know, policies are XML statements. When configuring policies in Bicep, we can use inline XML. However, that creates a maintenance nightmare when it’s not easily readable. Plus, the encoding and other pain points of not looking at formatted XML come into play.
I usually encourage keeping policy XMLs in a subfolder directly beneath the corresponding resource level and using Bicep’s built-in functionality loadTextContent() as rawxml instead. Also, following a consistent naming pattern, we will soon get a good hang of our policies and know where they apply just by glancing at their names.
e.g.:
-
globalServicePolicy-[env].xml(Environment-based policies for All APIs) -
[workspace-name]-apis.xml(Policy for all APIs under a Workspace) -
[product-name]-apis.xml(Policy for all APIs under a product) -
[api-name]-apis.xml(Policy for collection of API operations, aka APIs) -
[api-name]-[operation]-api.xml(Policy for each API operation, aka API)
Loading Environment Base XML File
Given that we need a predefined file path to load XML, the example below shows when we need to maintain XML policies per environment’s sake. It is only when we can’t easily parameterise our XML consistently across different environments. Usually, for global policies, this is handy when we have to maintain various CORS endpoints, which we certainly don’t need in the production instance.
/*
------------------------------------------------
Parameters
------------------------------------------------
*/

@description('Required. Environment Short Name.')
param environmentShortName string

@description('The name of the API-M instance.')
param apimServiceName string

/*
------------------------------------------------
Variables
------------------------------------------------
*/

var envConfigMap = {
  dev: {
    policyFile: loadTextContent('./globalServicePolicy-dev.xml')
  }
  test: {
    policyFile: loadTextContent('./globalServicePolicy-test.xml')
  }
  prod: {
    policyFile: loadTextContent('./globalServicePolicy-prod.xml')
  }
}

/*
------------------------------------------------
Policy
------------------------------------------------
*/

resource apimService 'Microsoft.ApiManagement/service@2023-03-01-preview' existing = {
    name: apimServiceName

    resource policy 'policies@2021-08-01' = {
        name: 'policy'
        properties: {
        format: 'rawxml'
        value: envConfigMap[environmentShortName].policyFile
        }
    }
}
Loading a policy from XML File
In all other instances, ensure the XML policy file is parameterised with API-M Named Values, which are interchangeable through configuration for each environment.
resource <parent-resource-symbolic-name> '<resource-type>@<api-version>' = {
	<parent-resource-properties>
    ...
    resource policy 'policies@2023-03-01-preview' = {
        name: 'policy'
        properties: {
            format: 'rawxml'
            value: loadTextContent('policies/[policy-file-name].xml')
        }
    }
}
Conclusion
Azure API Management (API-M) Policies are the core feature of the service that makes API management so powerful. The XML statements and C# expressions enable API administrators to uplift the APIs beneath to support more modern standards and protect API backends from malicious use.
When developing policies, it is essential to understand how backend services behave and how to uplift the capabilities the backend cannot handle independently. Because API-M can do a lot of customisation and transformation on the policy level, it is essential to understand that API-M core capabilities should focus on management aspects rather than catering to missed requirements from the backend, except in the case of legacy systems.

Uncle Ben (Spider-Man)
Policies are great and powerful. So, use it carefully and consider the long-term maintainability of the solution.

Leave a comment