
Azure DevOps Service Connection to Azure Resource Manager using Service Principal
When using Azure DevOps to manage your code and when you need to deploy your solution into an Azure subscription via pipelines, you will need a service agent account/ credential with adequate rights to deploy and configure your cloud resources.
This task is relatively easy with few clicks if you have administrative rights to DevOps and Azure.
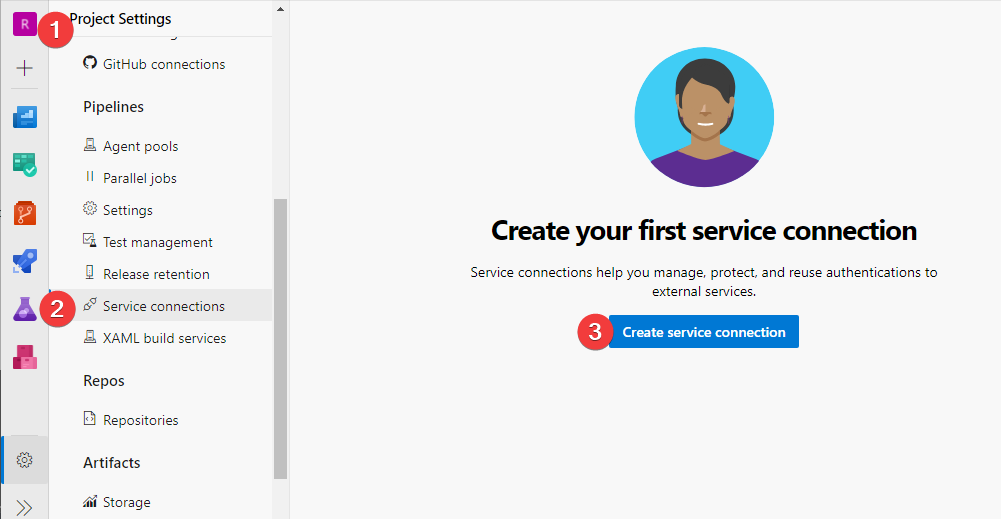
- Navigate to Project Settings
- Service Connections (under Pipelines)
- New Service Connection
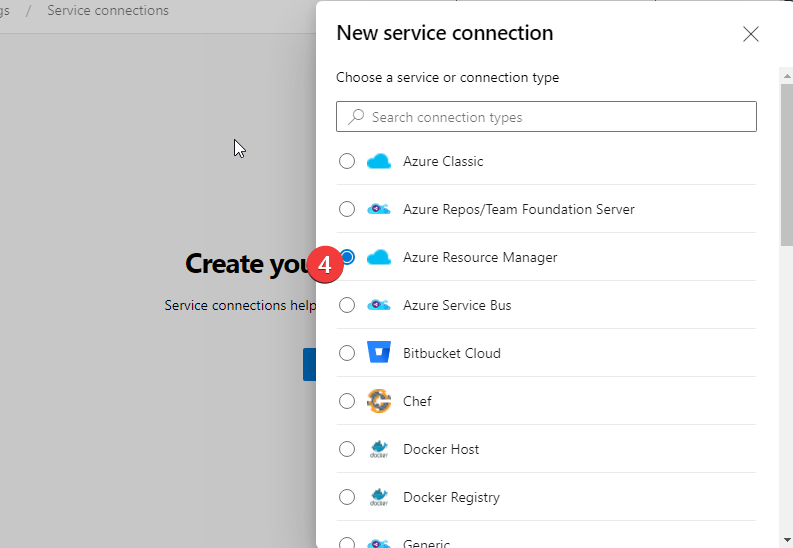
- Azure Resource Manager (ARM)
- Service Principal (Automatic)
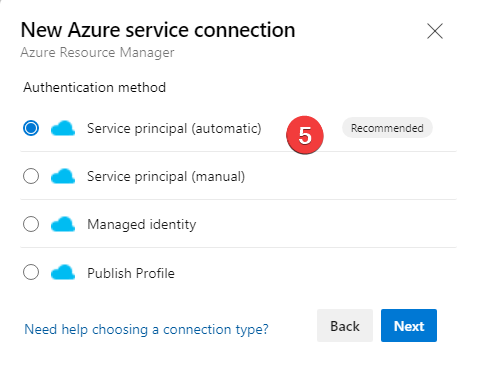
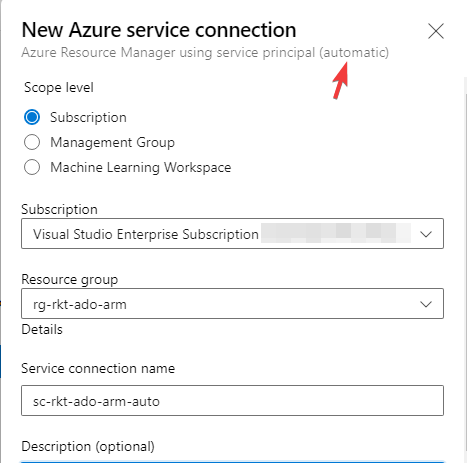
Then you select the subscription and a resource group (assuming you scope it at the subscription level), give it a friendly name to refer to in the Azure DevOps pipelines, it does all the behind-the-scenes tasks for you set it up. It is quick, easy, and much faster if you have the proper permissions and want to do a quick PoC.
The Problem
In the real world, it is not the case. Remember! We must embrace the least privileged access principles. As a result, a developer may be given only the access they need to do their job. So more likely, that developer may not have sufficient permission to do this from the same account they are using for Azure DevOps. Most of the time, a cloud admin need to do this setup from the Azure side, and a developer must at least have DevOps project administrative rights.
Secondly, even the above click base approach will create the same result; the object names contain random characters, which will be challenging to keep track of and not a good practice to keep your AD environment clean.

Lastly, if you play with many Azure DevOps PoC projects for R&D reasons, the automatic approach will demand more housekeeping. So creating one service connection against the entire subscription might be good to avoid clean-up activities. However, remember it is not a good practice to do in Production.
Create Service Principal - Using AZ CLI
The following can also achieve via Azure Portal UI, But I like to geeky way ![]()
To achieve this, we will use az ad sp create-for-rbac command. When creating, we can choose either password-based authentication or certificate-based authentication. In this instance, I will use password-based authentication.
Important When creating the service principal using the az ad sp create-for-rbac command, the output shows credentials. Please keep it safe. As an alternative, consider using (managed identities)[https://docs.microsoft.com/en-us/azure/active-directory/managed-identities-azure-resources/overview] if possible to avoid the need to use credentials. Also, to reduce the attack surface for a compromised service principal, consider assigning a more specific role and narrowing the scopes to a resource or resource group. See (Steps to add a role assignment)[https://docs.microsoft.com/en-us/azure/role-based-access-control/role-assignments-steps].
First, open a Cloud Shell or PowerShell + az login. Make sure you have set your session to the correct subscription if you are planning to read any values from the command on the fly, like subscription Id.
Please consider giving the service principal an identifiable name. In my case, I have named it spn-rkt-ado-arm. Replace the remainder of the variables with your requirements.
Please ensure that the service principal scope and role you assign have sufficient permissions, especially if you deploy resources across multiple resource groups.
# Creating a service principal scoped for a resource group (rg-rkt-ado-arm) with Contributor role.

subscriptionId=$(az account show --query id -o tsv)
resourceGroupName="rg-rkt-ado-arm"
spnName="spn-rkt-ado-arm"
roleName="Contributor"
scope="/subscriptions/$subscriptionId/resourceGroups/$resourceGroupName"

az ad sp create-for-rbac --name $spnName --role $roleName --scopes $scope
The output will look similar. Record the following values.
- App Id
- Password
- Tenant Id
# Output modified for security.
{
  "appId": "e036bf1e-0000-0000-0000-000000000000",
  "displayName": "spn-rkt-ado-arm",
  "password": "Pwx9AYW-_.XxXxXxXxXx-XxXxX.XxXxXxX",
  "tenant": "0f09042a-0000-0000-0000-000000000000"
}
You will also need a few subscription (az account) level info for the next steps.
# get the current default subscription using below
az account show --output table
Record the subscription Id and name.
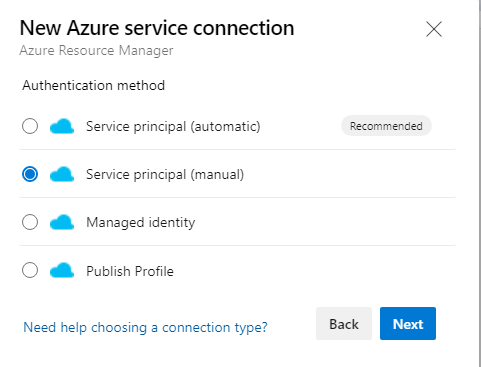
Setup Azure DevOps Service Connection
To use the service principal we created in Azure DevOps, select the DevOps project similar to creating Service Principal (Automatic) do the following;
- Service Connections (under Pipelines)
- Azure Resource Manager (ARM)
- Select Service Principal (Manual)
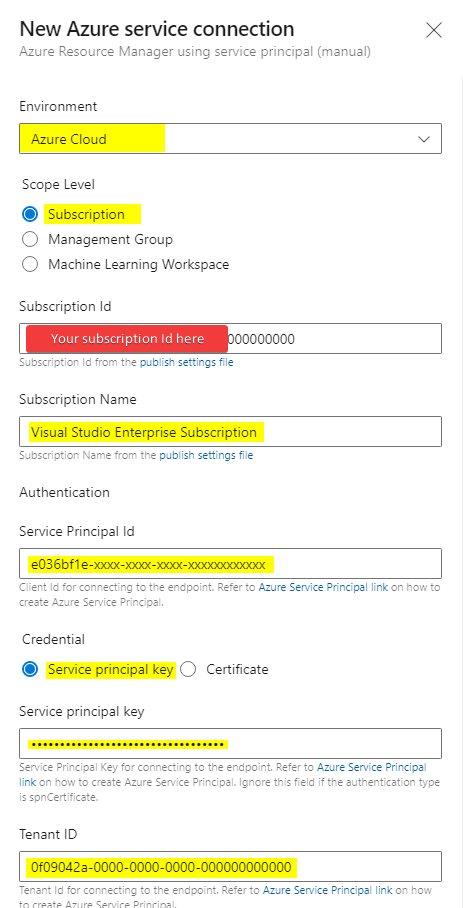
- Environment as Azure Cloud
- Scope Level as Subscription
- Subscription Id as Your Subscription Id
- Subscription Name as Your Subscription Name
- Service Principal Id as App Id recorded earlier
- Credential as Service Principal Key
- Service Principal Key as password recorded earlier
- Service Connection name as a familiar name (This is the name you will refer to in pipelines.
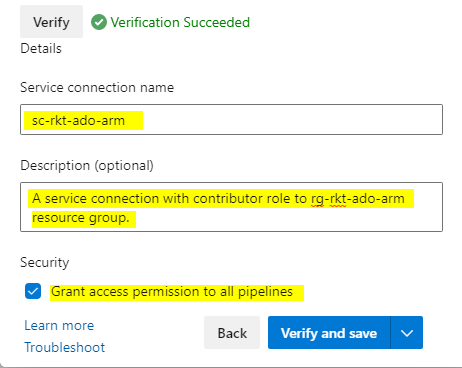
You can use description to explain the connection’s scope or permission so developers know its capabilities.
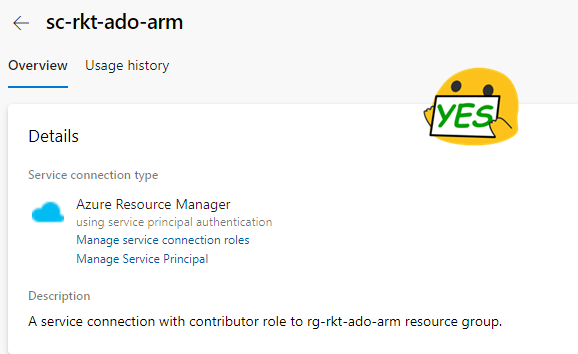
From the security side, if you prefer, you can grant permission to all pipelines within the DevOps project here. Finally, hit verify and save. DevOps should validate the information provided by you and create the service connection.

That’s pretty much it; yes, it took a little bit of time and effort. But the outcome is much cleaner.
Wrapping up
In my final thoughts on this post, you still need elevated privileged access to set up the service principal. However, the critical outcome here is the developers should not have rights to it themselves, and quite frankly, they don’t need to.
Remember, we aim to give the developers the least access they need to do their work. So service principals will have more control over deploying and configuring your cloud resources via pipelines. In this instance, I only create one service principal. But in an ideal world, we might generate more fine-grained permissions for each of our environments (Dev, Test, Prod), and they may have rights only to perform certain operations. So we don’t need one super service principal having too many powers. e.g., The same service principal provisioning infrastructure doesn’t need to be the same one to run database migrations that will need access to the database’s data plane. Hence, why I wouldn’t say I lik doing such via Azure Portal. Instead, I want to use scripted commands to deliver these service principles repeatedly with some standards.
I hope you find it helpful; In future posts, I will extend this with various use cases in a future post.

Leave a comment